3. Python Environments#
In this lecture, you will learn about Python environments and how best to use them to create reproducible pipelines.
Attribution The content of this lecture are modified from three excellent sources: Python Packages for Earth Data Science from Earth Lab CU Boulder; Managing Python Environments from Columbia University; Introduction to Conda for (Data) Scientists from Software Carpentry; and Managing a Development Environment by Descartes Labs.
3.1. Background#
Python and nearly all of the software packages in the scientific python ecosystem are open-source. They are maintained and developed by a community of scientists and programmers, some of whose work is supported by universities, non-profits, and for-profit corporations. This work mostly happens in the open, via github and other online collaboration platforms.
When working with a programming language, such as Python, that can do almost anything, one has to wonder how this is possible. You download Python, it has about 25 MB, how can everything be included in this small data package. The answer is - it is not. Python, as well as many other programming languages use external libraries or packages for being able to do almost anything. You can see this already when you start programming. After learning some very basics, you often learn how to import something into your script or session.
Definitions
Module: a collection of functions and variables, as in a script
Package: a collection of modules with an __init__.py file (can be empty), as in a directory with scripts
Library: a collection of packages with related functionality
Library/Package are often used interchangeably.
3.2. Dependencies#
A bit further into your programming career you may notice/have noticed that many packages do not just do everything on their own. Instead, they depend on other packages for their functionality. For example, the SciPy package is used for numerical routines. To not reinvent the wheel, the package makes use of other packages, such as NumPy (numerical python) and matplotlib (plotting) and many more. So we say that NumPy and matplotlib are dependencies of SciPy.
Many packages are being further developed all the time, generating different versions of packages. During development it may happen that a function call changes and/or functionalities are added or removed. If one package can depend on another, this may create issues. Therefore it is not only important to know that e.g. SciPy depends on NumPy and matplotlib, but also that it depends on NumPy version >= 1.6 and matplotlib version >= 1.1. NumPy version 1.5 in this case would not be sufficient.
This emphasizes the need for creating and recording environments (in virtual terms!) to run your Python code.
3.3. Environments#
When starting with programming we may not use many packages yet and the installation may be straightforward. But for most people, there comes a time when one version of a package or also the programming language is not enough anymore. You may find an older tool that depends on an older version of your programming language (e.g. Pyhton 2.7), but many of your other tools depend on a newer version (e.g. Python 3.6). You could now start up another computer or virtual machine to run the other version of the programming language, but this is not very handy, since you may want to use the tools together in a workflow later on. Here, environments are one solution to the problem. Nowadays there are several environment management systems following a similar idea: Instead of having to use multiple computers or virtual machines to run different versions of the same package, you can install packages in isolated environments.
However, managing Python development environments can be tricky, especially if you are new to the language or less familiar with computer science concepts. In this course, we introduce tool to make it easy to manage and reproduce your Python environments on any machine (local computer/server/cloud).

Fig. 3.1 The complexity of Python environments as illustrated by xkcd.#
3.4. Environment management#
An environment management system solves a number of problems commonly encountered by (data) scientists.
An application you need for a research project requires different versions of your base programming language or different versions of various third-party packages from the versions that you are currently using.
An application you developed as part of a previous research project that worked fine on your system six months ago now no longer works.
Code that was written for a joint research project works on your machine but not on your collaborators’ machines.
An application that you are developing on your local machine doesn’t provide the same results when run on your remote cluster.
An environment management system enables you to set up a new, project specific software environment containing specific Python versions as well as the versions of additional packages and required dependencies that are all mutually compatible.
Environment management systems help resolve dependency issues by allowing you to use different versions of a package for different projects.
Make your projects self-contained and reproducible by capturing all package dependencies in a single requirements file.
Allow you to install packages on a host on which you do not have admin privileges.
3.5. Conda#
Conda is an open-source package management system and environment management system that runs on Windows, macOS, and Linux. When you install one module using conda, such as JupyterLab, all of the required modules will also be downloaded and installed with compatible versions. It was created for Python programs but it can package and distribute software for any language (Python, R, Ruby, Lua, Scala, Java, JavaScript, C/ C++, FORTRAN)
Conda as a package manager helps you find and install packages. If you need a package that requires a different version of Python, you do not need to switch to a different environment manager because conda is also an environment manager. With just a few commands, you can set up a totally separate environment to run that different version of Python, while continuing to run your usual version of Python in your normal environment.
While there are multiple ways to install conda for Python, including Anaconda Distribution and Miniconda Distribution. Fig. 3.2 shows the difference between Conda, Miniconda and Anaconda. Miniconda combines Conda with Python and a small number of core packages; Anaconda includes Miniconda as well as a large number of the most widely used Python packages (> 150).
We recommend Miniconda, the most lightweight and bare-minimum approach to using conda. While the Anaconda distribution has a lot of packages pre-installed, they are not used all together in most of the projects. Therefore, it is optimal to install Miniconda and benefit from the Conda package and environment management systems but avoid installing too many unnecessary packages.
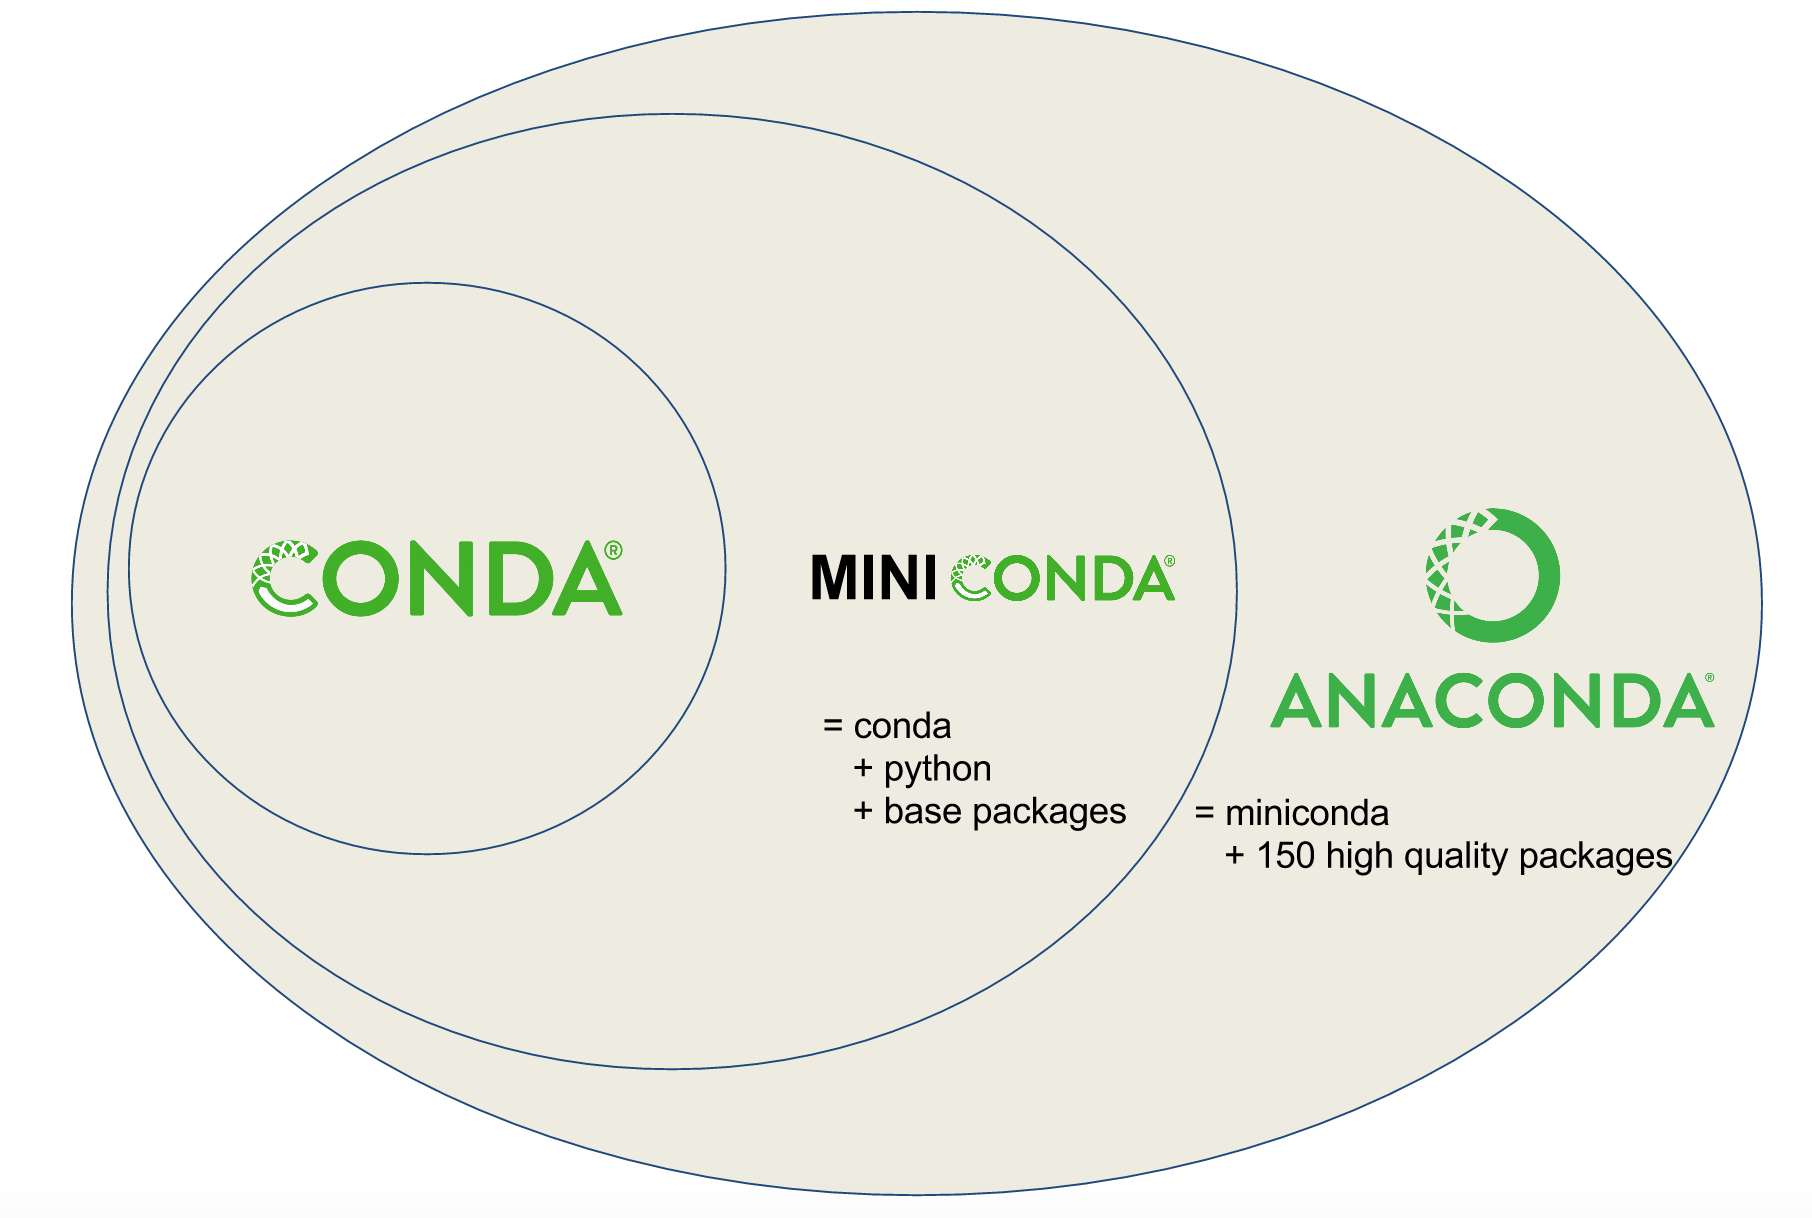
Fig. 3.2 Conda vs. Miniconda vs. Anaconda [Source: Planemo Documentation]#
3.6. Installing Miniconda#
You can download the installer for Miniconda from this page. Make sure to download the correct version depending on your OS and hardware. Follow the step on Quick command line install to install Miniconda.
After finishing the installation, and opening a new terminal (or reloading it) you should see (base) at the start of your prompt in the terminal. This indicates that you are in the “base” Conda environment:
(base) $
For simplicity, we avoid including the (base) environment name for any code block in this book.
Warning
Conda has a default environment called base that include a Python installation and some core system libraries and dependencies of Conda. It is a “best practice” to avoid installing additional packages into your base software environment. Additional packages needed for a new project should always be installed into a newly created Conda environment.
3.7. Creating Environments#
A Conda environment is an isolated workspace where you can install specific versions of Python and packages without affecting your system-wide Python installation. Each environment has its own set of packages, making it possible to have different versions of packages in different environments. This isolation is essential for avoiding conflicts and ensuring the reproducibility of your projects.
To create a new Conda environment, use the conda create command. Here’s the basic syntax:
$ conda create --name myenv
Replace myenv with the name you want to give to your environment, and use a name that reflects the project or assignment you will use this environment for.
If you wish, you can specify a particular version of Python for Conda to install when creating the environment. For example, to create an environment named “g313-a1” with Python 3.8, use the following command:
$ conda create --name g313-a1 python=3.8
3.8. Activating and Deactivating Environments#
Once you’ve created an environment, you can activate it to start working within that isolated space. To activate an environment, use the conda activate command:
$ conda activate g313-a1
When the environment is activated, your command prompt will display the environment name to indicate that you are working within it (e.g. (g313-a1)username@hostname ~ $).
To deactivate the current environment and return to the base (system-wide) environment, use the conda deactivate command:
(g313-a1) $ conda deactivate
Tip
To see all the environments on your system:
$ conda info --envs
If you want to permanently remove an environment and delete all the data associated with it:
$ conda env remove --name my_environment --all
For extensive documentation on using environments, please see the Conda documentation.
Tip
You can avoid spelling out the full option for conda commands and use their first letter with a single -.
For example, the two following commands are the same:
$ conda create --name myenv

$ conda create -n myenv
3.9. Installing Packages in an Environment#
After activating an environment, you can use conda to install packages specific to that environment. For example, to install the NumPy package into your “g313-a1” environment, use the following command:
$ conda install numpy
Conda will ensure that the package and its dependencies are installed in the active environment.
If you list more than one package to be installed, Conda will download the most current, mutually compatible versions of the requested packages.
In order to make your results more reproducible and to make it easier for research colleagues to recreate your Conda environments on their machines it is a “best practice” to always explicitly specify the version number for each package that you install into an environment. If you are not sure exactly which version of a package you want to use, then you can use conda search to see what versions are available. For example, if you wanted to see which versions of NumPy were available, you would run the following.
$ conda search numpy
You can then update your conda install command as following to install NumPy version 1.25.2:
$ conda install numpy=1.25.2
Finally, you can specify multiple packages and their version in the conda create command if you wish to install them when creating a new environment. For example, the following command will create a new environment called scipy-env and install four packages:
$ conda create --name scipy-env ipython=7.13 matplotlib=3.1 numpy=1.18 scipy=1.4
Another benefit of using Conda for package and environment management is that it allows you to install packages using pip too. Outside of the scientific python community, the most common way to install packages is to search for them on the official PyPI index. Once you’ve found the package you want to install (you may have also just found it on github or elsewhere), you use the pip command from a the command line:
$ pip install <package-name>
This will fetch the source code, build it, and install it to wherever your $PYTHONPATH is set. This works in the vast majority of cases, particularly when the code you’re installing doesn’t have any compiled dependencies.
If you can’t find a package on either PyPI or conda-forge, you can always install it directly from the source code. If the package is on github, pip already has an alias to do this for you:
$ pip install git+https://github.com/<user>/<package-name>.git
3.10. Channels and Conda-Forge#
The packages that you install using the conda command are hosted on conda channels. From the conda docs:
Conda channels are the locations where packages are stored. They serve as the base for hosting and managing packages. Conda packages are downloaded from remote channels, which are URLs to directories containing conda packages. The
condacommand searches a set of channels. By default, packages are automatically downloaded and updated from the default channel which may require a paid license, as described in the repository terms of service. Theconda-forgechannel is free for all to use. You can modify what remote channels are automatically searched. You might want to do this to maintain a private or internal channel. For details, see how to modify your channel lists.Conda-forge is a community channel made up of thousands of contributors. Conda-forge itself is analogous to PyPI but with a unified, automated build infrastructure and more peer review of recipes.
The Anaconda channel terms of service clearly excludes all educational activities and all research activities at non-profit institutions from their definition of commercial usage. Even companies with fewer than 200 employees are excluded. The aim of the commercial paid license for Anaconda is to require large corporations which use the repository heavily to contribute financially to its maintenance and development. Without such contributions, Anaconda might not be able to sustain itself.
The simple way to specify your preferred channel is to pass the -c option when you run conda install:
$ conda install -c conda-forge {package_name}
3.11. Managing Environment Dependencies with environment.yml#
To ensure that your project can be easily reproduced on different systems, you can create an environment.yml file that lists all the dependencies for your project, including Python version and packages. Here’s an example of an environment.yml file:
name: g313-a1
channels:
  - defaults
dependencies:
  - python=3.10 # Specify Python version
  - numpy=1.25.2
  - matplotlib=3.7.1
  - pandas=2.0.3
You can create a Conda environment from this file using the following command:
$ conda env create -f environment.yml
This command will create an environment named “g313-a1” with the specified dependencies.
Note: This command conda env create is different from conda create. If you are only passing -f to conda for creating a new environment, you need to use conda env create.
3.12. What about pip?#
pip is a package manager for Python that simplifies the process of installing, upgrading, and managing Python packages and dependencies. Its name is a recursive acronym for “Pip Installs Packages,” emphasizing its primary function: installing packages.
pip works by connecting to the Python Package Index (PyPI), a repository that hosts a large collection of Python packages contributed by the open-source community. PyPI serves as the central hub where developers publish their Python packages. In most cases, pip comes pre-installed with Python.
You can install packages using the pip install command as following:
$ pip install numpy==1.25.2
Note the syntax difference for specifying package version in pip install (==) and conda install (=).
3.13. Using pip with Conda#
To benefit from the strengths of both pip and Conda, you can use them together. Conda is a powerful environment management system that also serves as package management, but there might be cases that a package or a specific version of package is not available on Conda. In that case, you can use pip together with conda and install any required packages. By combining Conda and pip, you can create reproducible and isolated Python environments while benefiting from pip’s extensive package ecosystem.
The simplest way to use pip with conda, is creating a new conda environment, and activating it. Then run pip install in the new environment. In this case, pip will install the package(s) in the conda environment only, and not in your base environment.
You can also specify pip packages in your environment.yml file. Here is an example of such file:
name: my_env
channels:
  - defaults
dependencies:
  - python=3.10

  # Packages from Anaconda defaults channel
  - numpy
  - pandas
  - scikit-learn

  # Packages from pip
  - pip:
    - requests
    - matplotlib
Tip
Check out this Conda cheatsheet to look for some quick answers to your Conda related questions.